Note: The information here is for people with some familiarity with screen printing and computer graphics, specifically Adobe Photoshop.
Here are a few examples of how I do color separations for silk screened posters in Photoshop. Of course, you can do color separations by hand and cut the film, but I did that for way too many years before we had computers. So screw that. I’ll give up my Adobe Photoshop when they pry it from my cold, dead fingers. Still have a bunch of Rubylith in a box somewhere. You can have it.
To start with I draw my art by hand. In case you are wondering, I sketch the drawing and transfer my sketch to Graphics 360 Marker paper with a mechanical pencil, tightening the sketch as I transfer it, and then ink it with markers, mostly Pigma Micron. Both the regular markers and the brush markers. I don’t use white out. If I make a mistake, I usually draw the correction right through the mistake and fix the line art in Photoshop. I'm not trying to produce an original masterpiece, just a good final product and fast is better.
Once the art is finished and the pencil lines erased, I scan it at a pretty high resolution in Black & White Grayscale mode. The resolution depends on what size I drew the art. I have a pretty tight drawing style so I sometimes draw the art smaller than the finished print size and scan it at 600 pixels/inch. If the art is closer to the final size I might use 400 pixels/inch.
I scan it in Grayscale, import it into Photoshop and use Image > Adjustments > Threshold to change the image to a bitmap and eliminate the anti-aliasing that makes the lines fuzzy, playing with the setting to get the line weight I want. If the line art is too light I will use the Brightness/Contrast adjustment to darken the lines before I use the Threshold adjustment. Once the art is totally black and white with no grays I touch up the art with the pencil tool to keep the hard edge on the art. Keeping the edge non-anti aliased makes selecting the lines easy and doing the separations easy and accurate. I do the separations in either RGB or CMYK mode. If you are printing the seps out on an inkjet printer like we do, it doesn't matter much.
Here’s a scan of some line art before it was touched up. Scanned at 600 pixels/inch. You can see some of the mistakes I made in the inking.

Here’s a closeup of the line art after it’s been touched up. The final resolution ended up being 372 ppi at print size, 18” x 22”.

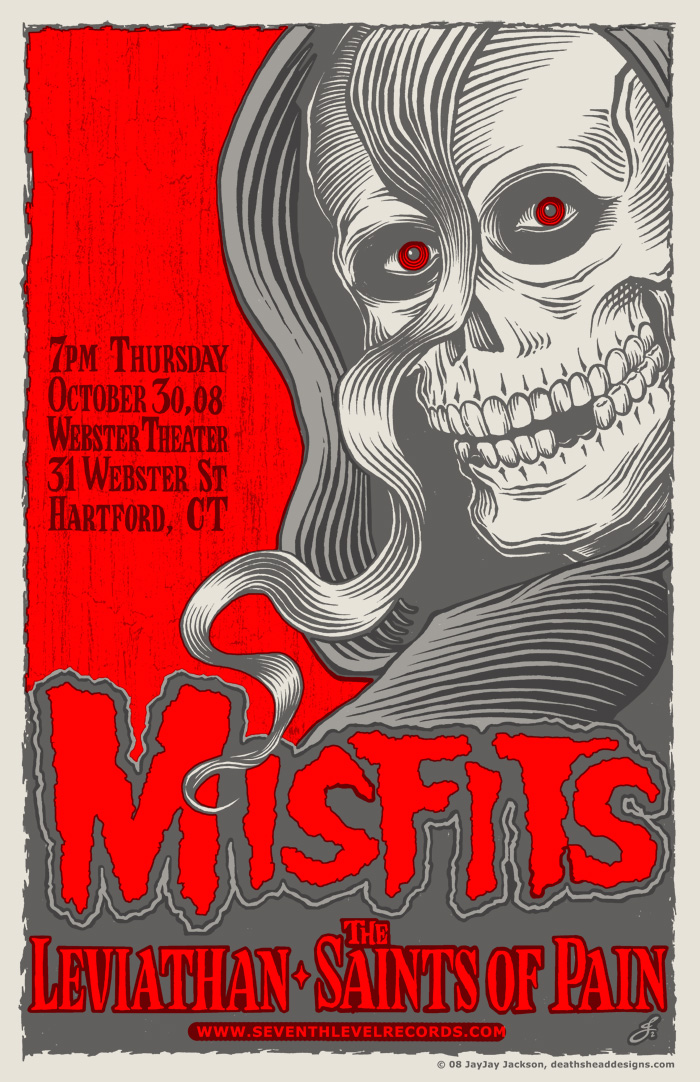
Here’s the final color art that was separated for screen printing.

Here’s an animation of the 4 color separations.

For the Misfits poster described in my last blog post, I drew the line art and later decided how to color separate the colors. I had a pretty good idea of how to color it, but it wasn’t totally planned. Here are some possibilities I tried out. The last one is the one I decided on:

That last combination of colors made parts of the separations slightly complicated. Here’s the line art I started with.

Here are the separations for that poster with the black line art grayed out a bit so you can see the overlap of the other colors, the red and the gray.
Here are some detail shots of part of the poster. This is all three colors with the black lines grayed out some.

This is just the gray and the red without the black lines.

This is just the black and the red with the black lines grayed out.

This is all three colors as it would print.

Sometimes doing color separations is easy. Below is a detail of a poster I did for a Viking Kings show. I drew the black line art and mostly just had to fill in the colors.

Here’s the same detail with the black lines grayed out.

To do the seps for this Viking Kings poster, I just selected the open areas with the Magic Wand Tool in Photoshop, with anti aliasing turned off (unchecked). Once I had the areas selected I went to the Select menu and used the Modify > Expand to make the selection larger and then filled the area with color on a new layer (Edit > Fill). I do the color separations in color at first and then fill them with black to print the layers on transparencies, since you need good solid black art to burn the screen. You can see on the detail above that there were a few areas that I had to draw the color in by hand, using the pencil tool, but most of it I was able to just Expand and Fill.
On the Misfits poster, there’s a good bit of outlining done by hand, but I take any shortcut I can whenever I can. I knew I would print the colors in the order red - gray - black and I did the separations for that order. Hopefully all of that is clear. If you get the concept, then the best way to explain it is to just show you what I did, hence all of the big pictures. The information is not for beginners, but if you would like more information or explanation, you can email me and I will try to answer your questions.
There are many other ways to do separations and I would urge anyone reading this to seek out more information and choose the way the suits you best. The best way to figure out the best way is to know all the ways.
Next: The World’s Most Painful Poster
Very groovy. I wish I could just hang out in the basement and watch. I learn better that way. Kinda funny that for a wanna-be writer werds iz too hard! haha. I think I get the basic concept though! Thanks! Great post!
ReplyDeleteI use a lot of pictures because describing a lot of this stuff with just words is so hard. I may try to do some videos in future.
ReplyDeleteTweeting this article too ... You Rock !!!
ReplyDeleteGreat article! Very clearly laid out and informative. I have some questions though. First, are you using layers or channels? I dont really know how to use channels right now but maybe you could explain that if you do use them? I am also wondering how to do registration marks in photoshop? Any advice? Thanks!
ReplyDelete