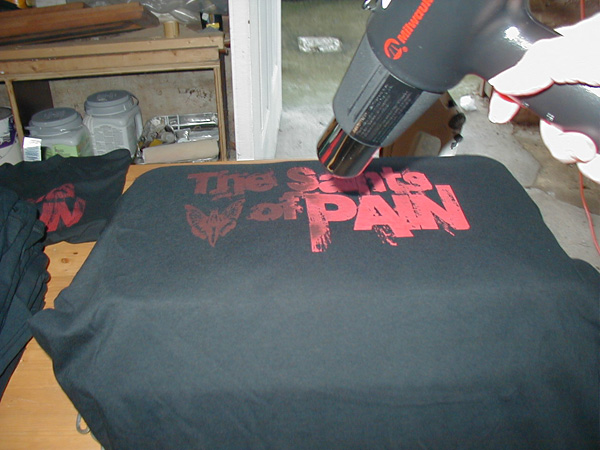
You can only cure a small area at a time with a heat gun, 5 or 6 inches around maybe. The discharge ink needs to be cured 30 - 45 seconds, until it changes color. Before it dries. So it was a problem because the t-shirts get screened faster than you can cure the shirts. We dealt with that problem by doing small runs of shirts. A normal run for us was 20-30 shirts. It was less of a problem on smaller designs, a big problem on large ones.
No Problem

Problem

Our heat gun curing station was pretty funny. We used a foil steamtable warming tray turned upside down on its wire frame. Hey, it worked and it was free. We never caught one single thing on fire. Singed a shirt once, but everyone does that.
We tried doing plastisol on some shirts and tried all the tricks the videos said to tell if the ink was cured. The plastisol ink is supposed to cure for 45 seconds at 320-350 degrees. I would measure the temperature to get my distance right, controlling the heat on the shirt by the distance of the gun from the shirt (about 4 or 5 inches away to get 340-ish degrees) and count to 45 while curing a little area. Crazy, huh? Most of the shirts were ok, but we had a couple of them where the design was damaged when washed. I supposed it hadn’t been cured enough. And some we overcooked and the design got weird looking and too shiny in spots. So the heat gun is tricky with plastisol ink, in our experience. Larger designs are really hard. With the discharge ink, at least you can tell when it’s cured... it turns a lighter color as it discharges the color from the shirt.
We really needed to get a forced-air flash dryer to take our business to the next level, but that was a distant dream since they are quite expensive. I wrote about it on the Deaths Head blog back in 2009.
We kept saving up, even as we went through some tough economic times, and I kept searching for any reasonable solution. I called manufacturers and spoke to sales reps about flash dryers to learn as much as I could about the equipment out there. You can read a lot, but sometimes you have questions that only an expert can answer.
So I finally found a less expensive forced air flash unit, the Ranar DA-1616 that seemed like it would work for us. It had what we needed for discharge inks:
- Forced air
- 16 x 16 inch coverage (we do larger prints, but we can move them around)
- Infrared heat source (a better option than heat coils)
- A 110 volt plug! (the only one I could find at the time that had this)

The thing that worried me was that no matter how hard I searched on the web, I couldn’t find any first hand information about the unit. I asked on forums like gigposters.com and t-shirtforums.com but no one knew anything about the Ranar dryer. Which worried me a little. One of our suppliers, Pocono Screen Supply sold these dryers, so I called them for information. They really didn’t tell me much more than what it said on the web sites I had found, but I decided that because of the price difference this was the unit we would get. Sold here.
The day finally came when we had enough money to order the unit! Waiting for it to come was agony! We ordered it right before Christmas 2009 and the company was closed for the holidays and didn’t ship it until almost the middle of January. So when it came, we were jumping around for joy! We hauled it to the studio and unpacked it and gazed in wonder at the mysterious looking plug. What was this?

We had never seen this kind of plug. My first thought was that they had sent us the wrong unit and it was a 220 volt instead. I called the company and they checked with Ranar and, no, it was the right unit, a 110 volt. But it was a 20 AMP unit. Most circuit breakers are 15 AMP. The circuit breakers in our studio were 15 AMP as it happened. Heck, we replaced the wall socket with the correct socket for that plug and tried it anyway. We wanted that flash dryer baaad. It blew the fuse. Again and again. There was no way. We looked into changing the fuse to a 20 AMP. There was no master cut off switch on that fuse box. We couldn’t find out where to shut off the main power to the studio. So the power couldn’t be cut off to the fuses and I wasn’t going to let Freddy try to hot swap a fuse in a live box. Damn. So what were we to do?
What else could we do? We looked for a new studio.
For a long time we had talked about finding a live/work space. We had started out in the shared basement of Freddy’s apartment building, but the landlord told us he didn’t want us screen printing down there. We did it secretly for a while, anyway. But hiding everything all the time was a huge pain. We tried screen printing inside Freddy’s tiny apartment. We even tried my apartment in Brooklyn. None of these were solutions. One day our wonderful friends from the band The Saints of Pain generously offered to share their rehearsal space with us and we set up our beautiful new studio in the rooms in the back of the space they rented. But there were water and power problems with the building. So, I gave up my apartment of 26 years in the beautiful, historic Park Slope neighborhood of Brooklyn (sigh) and moved in with Freddy to save money. We needed to find a new place to work. And live. We really needed that to be the same place. It took about 5 months of hard looking last year to find a place that we could afford that had enough space. I blurted out “We’ll take it!” once we examined the fuse box in the basement. It had some 20 AMP fuses in the basement! Oh yeah!
And the first time we used that flash dryer to cure shirts was sweet! Very, very sweet. It smelled like victory. Stinky, stinky victory. We’ve been using it for a few months here in our new place.
So, here’s the low down on that Ranar DA-1616 flash dryer for anyone who finds this on the internet, like I couldn’t.
- It’s a 110 volt unit and runs on regular household current, but it takes 20 AMP fuses and wiring and a special wall socket. We were unable to find an extension cord or adapter.
- It takes about 8 to 10 minutes to warm up fully.
- We were told by the manufacturer that it should be run on the highest setting at all times and to adjust the temperature by adjusting the distance of the unit from the shirt. That has worked fine for us, by the way. You can adjust the top up or down and it swings freely around. It has a handle on top that stays cool.
- We were advised that the unit works best if the surface under it is metal. We placed an old empty filing cabinet under it and lay the shirts, etc. on that. That has worked fine, too.
- I monitor the temperature closely with a laser sighted temperature gun until I feel the results I'm getting are consistent and then I only check occasionally through the run.
- It has worked well and even cured some plastisol shirts we had to do to replace some of the damaged ones.
Some of the fruits of our labors are here:
Deaths Head Designs Shirts

Next: Why Screen Print?
Thanks for these precious info!
ReplyDeleteI will buy a forced air flash dryer soo, but I'm wondering if I would be better off with Ranar the DA-2020 (plugs and breakers are no problem here). There's only a $150 difference and I guess my shirts would cure a bit faster and allow for a bit larger designs. What do you think ? Is cure already quite fast with the DA-1616?
We usually give it 45 seconds or so to make sure the shirt is cured, but that seems pretty fast to us since before we were using the heat gun! I do spot check the temperature to make sure it is hot enough, about 350-360 degrees.
ReplyDeleteHeat gun user here also! :)
ReplyDeleteWow this was really helpful! thanks!
ReplyDeleteSuper helpful, thanks! I don't have room for a conveyor belt, but I'm getting a lot busier and even the heat press for curing is slowing me WAY down.
ReplyDeletewow, there's a lot of struggle and sacrificial for that flash dryer(towards the glory). i found many good informations from here. thanks. greetings from Malaysia...
ReplyDeleteThank you for sharing this information. The information was very helpful and saved a lot of my time.
ReplyDeleteCorporate promotional items
I will definetely try this tonight.
ReplyDeleteShare your art online
When curing a shirt, how long does the ink need to be at 320 degrees?
ReplyDelete