Monday, February 21, 2011

Top Ten Worst Screen Printing Mistakes

And How to Fix Them

1. Art problems -
A. Start with good artwork, properly prepared. Don’t use a low resolution jpeg and think you will get a good screen print out of it. The art should be a minimum of 300 ppi at print size.
B. Make sure you can print the design correctly and match it with the correct screen mesh for the artwork.
C. If you have a customer, make sure they sign an approval of the final design. You’d hate to reprint a design at your own expense because a word was misspelled!

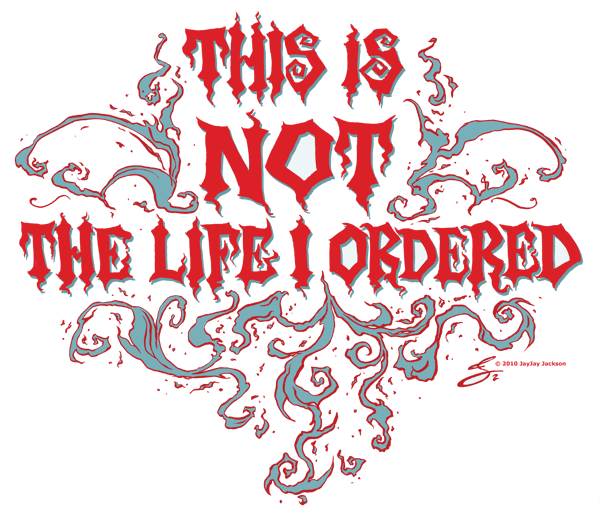
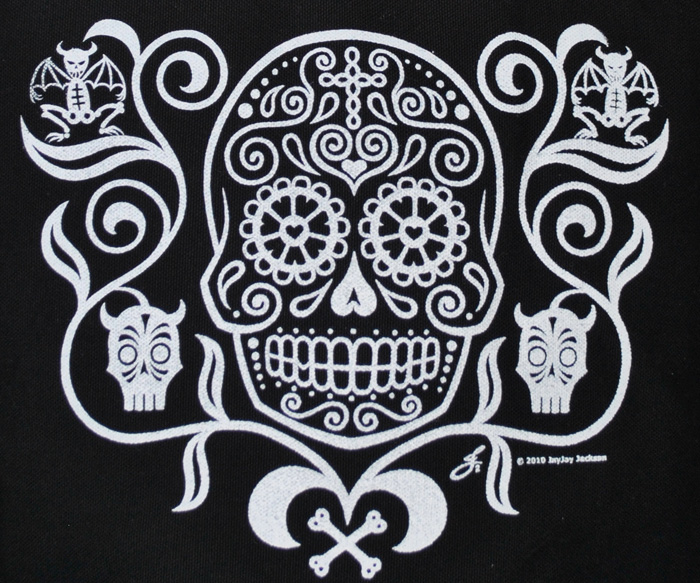
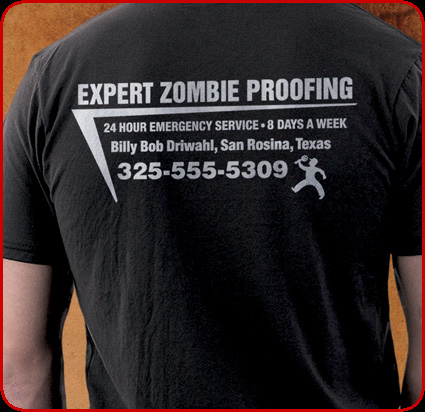
Here's a nice design made to look distressed. (a new design we are testing) Because of the small details we burned this art on 156 mesh screens to print on t-shirts.

2. Screen Exposure problems -
A detailed list of screen problems here: Troubleshooting Screen Problems

3. Bad registration -
A. Screens can become loose in the bracket on the press if not tightened enough.
B. The platen might be moving if the screw is not tightened enough. Turn it as tight as you can being careful not to strip it.
C. The shirt might be moving if you don’t have enough adhesive on the platen.

4. Screen break down -
A. If the screen was under exposed, the emulsion can loosen and come off. We always “post-expose” the screen. Which means we either place it in the sun after it’s been washed out and dried or we expose it again in the exposure unit to set the emulsion.
B. The squeegee can wear through the emulsion on a long print run or on a screen that has been used a lot. If the worn spots are outside of the design area you can clean the screen, spread a thin coat of emulsion over the worn areas and expose it to repair the bare spots.

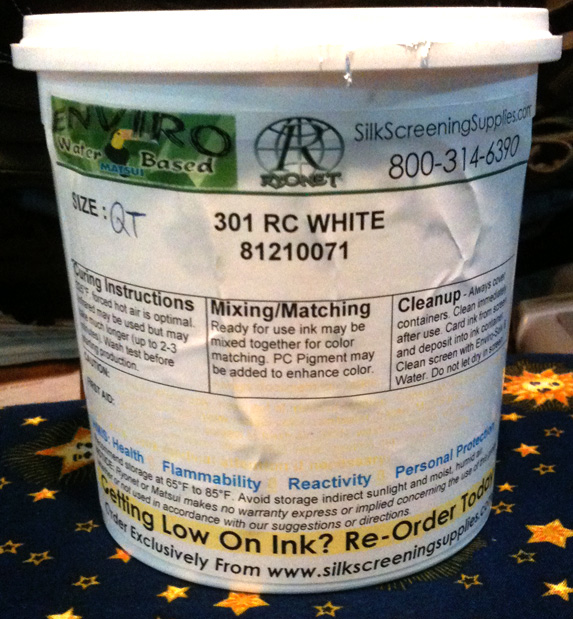
5. Bad ink curing, ink under cured or over cured -
A. Check the curing temperature with a temperature gun. And know what temperature the ink is supposed to cure at, of course. I usually print out a sheet of instructions that go with the ink and stick it to the lid of the ink container.

My instructions unfolded. They are stuck to the lid with double-sided tape.

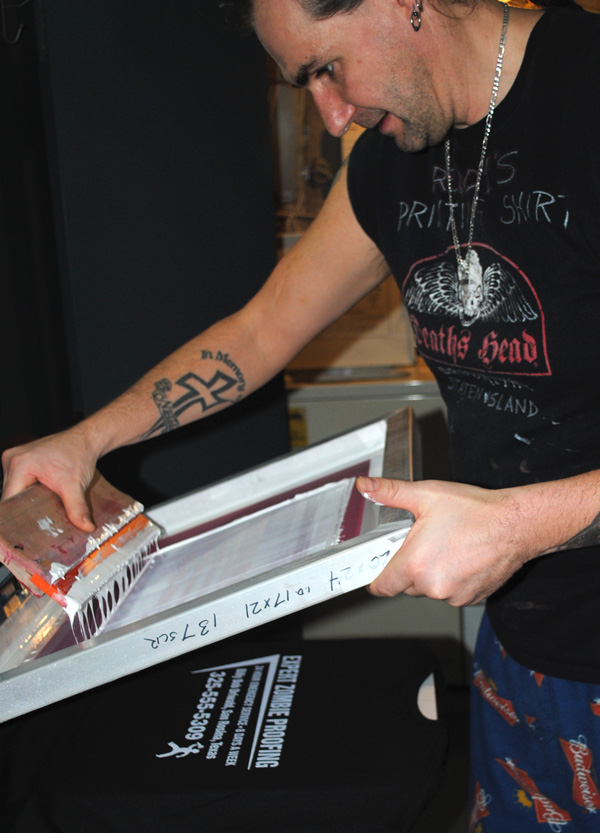
6. Incorrect squeegee angle -
A. Try for a consistent 45 degree angle when applying ink to the screen. Ink goes on pretty smooth at this angle. At an angle of 60-degrees or more, the ink may not get through the mesh correctly and evenly. An angle of 30-degrees or less can make the ink print too heavily onto the fabric.
B. You may need to experiment with the squeegee angle and practice to get it right, see what works for you and keep it consistent. You can also experiment with a “push” print stroke as opposed to the usual “pull” print stroke. There are cases when a push stroke can be useful. But always do one or the other, don’t switch between strokes.

Freddy usually screens a bit closer to a 60 degree angle, but that's what seems to work for him.

7. Ink spots or smudges on garment or product -
A. Keep the work area and your hands clean.
B. Check the screen carefully for pinholes and fill them with a screen touch-up pen or cover them with a piece of tape.
C. Wash out small spots with a wet shop towel or a spot cleaning gun. If you can’t clean it, keep the shirt and use it for test prints.

8. Design placed incorrectly -
A. Line up you screen carefully. We usually use a t-square to make sure the design is straight.
B. Not all shirts or other garments are sewn correctly or consistently. So you may not be able to use the collar or center crease to position a shirt. The most reliable way I’ve found to center a shirt is this: How to Center a Shirt for Silk Screening

9. Too much ink is getting printed onto the shirt -
A. You may be using too much pressure. Don’t press down too hard on the squeegee and use even pressure all the way across the print.
B. You may have gotten too much ink into the mesh on the back flood. Be careful as you back flood and don’t press down too hard or go over it too many times. If your ink does get too heavy, pull a few prints on test sheets without back flooding to clear out the screen.
C. The ink may be too thinned out
D. You may have an old squeegee with edges that are rounded and need to be sharpened.

10. Too little ink is getting printed onto the shirt -
A. Use a coarser mesh.
B. Make more than one squeegee pass to print. We sometimes do as many as 3, but that is usually the most we need.
C. The screen may be getting clogged. We will rub the underside of the screen with a wet shop towel and then screen a test print or two to try to clear it out. We print on test print squares or misprinted t-shirts and use blank newsprint when test printing for posters and art prints. (Note: We have been told that spraying water mixed with a little bit of dish soap on the underside of the screen before you put any ink on it helps when you print. We mean to try this next time we print.)
D. Try printing on a soft base. We sometimes use a platen covered in neoprene fabric. Especially when we want to print over collars or seams (more on this topic later).

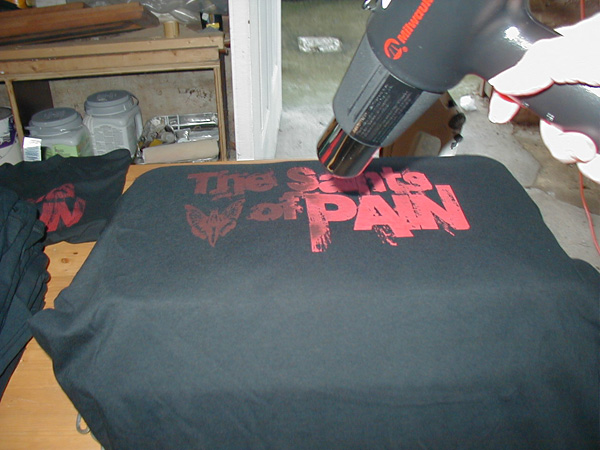
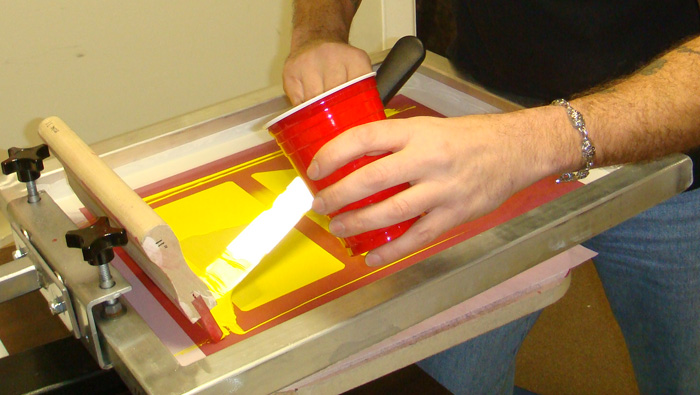
Here's Freddy adding more ink to a screen. You can see that there wasn't enough ink to back flood properly and it's spotty behind the cake spreader he uses for the ink.

Mistakes will happen, but my best general advice is to work carefully to head off problems before they happen.

Next: How to prepare a screen for printing.

Friday, February 11, 2011

How to Center a Shirt for Silk Screening

Some shirts that you will buy come with a center crease and many people use that center line to line up the shirt. I do too, but being a careful, ok, perhaps paranoid type I don’t trust that crease. I know that the crease can be off center or the shirt can be sewn crooked and it’s best to double check your placement so that you try your best to avoid a misprinted shirt. Also, not all shirts come with that center crease. Most of the recycled and higher quality shirts we buy don’t have one. A lot of the shirts we buy that don't have a center crease have side seams, however.

So, here’s how I line up a shirt on the platen.

I draw a carefully measured center line down the center of the platen. This is always good to have as a visual measure.

We will decide where to place the design on the shirt and figure out where the design on the screen will fall on the platen and I put a piece of masking tape on the platen and draw a mark about where the collar should fall to make the design print correctly on the shirt.

I open up a shirt from the bottom and slide it onto the platen all the way to the shoulder seams, making sure the shoulder seams are even on the platen edge.

I pull the shirt back carefully, keeping it straight until the collar hits the mark.

Then I use my thumbs to measure the distance from the edge of the platen to the arm hole seams and check to make sure they are the same distance on each side.

Then I slide my hands under the platen until my fingers are touching the side seams (if the shirt has side seams) and measure if the distance is even. If my fingers are touching the side seams and the platen is falling at the same place on each hand, the shirt should be pretty centered.

When the shirt has no side seams and no center crease, it’s a little harder. For the smaller sizes I use the same method as above and just look at the arm hole seams to see that the shirt is centered. For the larger sizes I fold the shirt in half lengthways and create a center line that looks right to me.

I pick up the shirt by the center line and get Freddy to help me slide it onto the platen and I place the center that I have pinched onto the center line drawn on the platen.


That’s how I place the shirts. Other people have other methods and you should check out everything you can and decide what works for you. Let me know if you find a better way. I'm always hoping to learn something new!

Next: Top Ten Worst Screen Printing Mistakes

Tuesday, February 8, 2011

Why Screen Print?

I’m an artist. I’ve always been an artist or intended to be one. I’ve done many different types of art... album art, magazine illustrations, book covers, comic books, trading cards, paintings, logos, product concepts and designs, packaging, brochures, maps, advertising, web sites... and t-shirts and posters.

I drew this! I'm an artist!

One thing about being an artist, unless you are simply exhibiting paintings, you are at the mercy of the people who reproduce your art. I dealt with that problem very early in my career by becoming an expert in printing and separations. That helped a lot.

But the passion to create has always been there. Along with a desire to communicate thoughts and ideas. After having other people print my work on t-shirts and posters, which was expensive and not always what I wanted I made the decision to try it myself. Control freak? Maybe. But I have a vision and I want it to be right. And affordable. So for me, screen printing was the way to go. But...

What if You Don’t Want to Screen Print?

Can you still create and sell your ideas on stuff? Yep. I do that, too. It may seem like an odd topic in a blog on screen printing, but it’s just another way to get your creativity out to the public. And maybe even make some money. You know... if you’re into that.

Let’s talk about on demand merchandise companies. I use Zazzle and Cafe Press, so I’ll cover those two. There are many more like Printfection, Spreadshirt or Pikistore. DeviantArt and Imagekind also specialize in art prints on demand. There’s even The Game Crafter that lets you create a board game and offer it on demand. Clever stuff!

The way these sites work is this... you create a design, upload it to the site, choose the products that the design can be printed on, place it into your own “shop” on their web site and it’s offered for sale. When someone orders a product like a t-shirt or coffee mug, the On Demand Company elves at the On Demand Company factory put your design on a blank product and ship it out to the buyer. And you get a tiny bit of the sale. Not a lot, but it’s not much work on your part and the sales add up. The main advantage it that it’s easy and open to anyone with an idea.

I’ve called Cafe Press and Zazzle my product testing sites. Some of the designs I come up with are too hard for us to print right now or I’m just not really sure if they are any good or maybe they don’t quite fit with what we do or maybe I’ve gone crazy and the design might be no good at all. Actually, I think I may be crazy quite a bit. But you can throw some ideas up on Cafe Press for little or no cost and see if if has potential. It’s also very fast for when you are impatient and caught up in the fire of inspiration and must have an idea out right away. This happens to me a lot.

I don’t know how to silk screen this one yet, but Cafe Press does it just fine:

Create your design and upload a computer file of the image to the site. It doesn’t need to be color separated, it will print onto the products just like an inkjet printer would. Cafe Press has good beginner instructions. The way I’ve chosen to do the images is I do a 300 dpi image at the largest size it would print on a product and save it as a PNG file. I’ve found that quality is very good and reproduces well.
Beginners Image Workshop

Cafe press also has resources for folks who want to sell on their site.
Resources for Shopkeepers

Cafe Press offers selling tools like this widget that can go on a web site. Or blog! It can be made in different sizes and colors to match your page’s scheme.
Make Custom Gifts at CafePress


Zazzle offers a similar panel to imbed in your web site or blog:

Look for a personalized gift at Zazzle.


You can use the same designs to upload on any of these on demand sites, so you can have multiple stores if you want to. I’ve tried these three:
My Cafe Press shop:
http://www.cafepress.com/seriousdesign

My Zazzle Store:
http://www.zazzle.com/JayJayJackson

My Printfection store
http://www.printfection.com/seriousdesign

All three are good, Cafe Press is a little more user friendly, Zazzle is more specific and you can make your products customizable by the person buying. Both Cafe Press and Zazzle seem to get good amounts of traffic, I sell a bit more on Cafe Press, but promoting your shop is up to you.

Some of my new designs!


Even an iPhone 4 case!

Next: How to Center a Shirt for Silk Screening

Friday, February 4, 2011

Drying and Curing Inks DIY Style

We started our operation on a small budget. A really small budget. We bought our no frills 4 color press for around $500 (new, off of ebay), bought some shirts and basic supplies and that was pretty much it. We scrounged and made do with everything else for a while. And we used a heat gun to cure the discharge and water-based inks. We also used the heat gun the couple of times we tried using plastisol inks. It worked, but with a few failures. Here’s what we used to do:

You can only cure a small area at a time with a heat gun, 5 or 6 inches around maybe. The discharge ink needs to be cured 30 - 45 seconds, until it changes color. Before it dries. So it was a problem because the t-shirts get screened faster than you can cure the shirts. We dealt with that problem by doing small runs of shirts. A normal run for us was 20-30 shirts. It was less of a problem on smaller designs, a big problem on large ones.

No Problem

Problem

Our heat gun curing station was pretty funny. We used a foil steamtable warming tray turned upside down on its wire frame. Hey, it worked and it was free. We never caught one single thing on fire. Singed a shirt once, but everyone does that.

We tried doing plastisol on some shirts and tried all the tricks the videos said to tell if the ink was cured. The plastisol ink is supposed to cure for 45 seconds at 320-350 degrees. I would measure the temperature to get my distance right, controlling the heat on the shirt by the distance of the gun from the shirt (about 4 or 5 inches away to get 340-ish degrees) and count to 45 while curing a little area. Crazy, huh? Most of the shirts were ok, but we had a couple of them where the design was damaged when washed. I supposed it hadn’t been cured enough. And some we overcooked and the design got weird looking and too shiny in spots. So the heat gun is tricky with plastisol ink, in our experience. Larger designs are really hard. With the discharge ink, at least you can tell when it’s cured... it turns a lighter color as it discharges the color from the shirt.

We really needed to get a forced-air flash dryer to take our business to the next level, but that was a distant dream since they are quite expensive. I wrote about it on the Deaths Head blog back in 2009.

We kept saving up, even as we went through some tough economic times, and I kept searching for any reasonable solution. I called manufacturers and spoke to sales reps about flash dryers to learn as much as I could about the equipment out there. You can read a lot, but sometimes you have questions that only an expert can answer.

So I finally found a less expensive forced air flash unit, the Ranar DA-1616 that seemed like it would work for us. It had what we needed for discharge inks:
- Forced air
- 16 x 16 inch coverage (we do larger prints, but we can move them around)
- Infrared heat source (a better option than heat coils)
- A 110 volt plug! (the only one I could find at the time that had this)


The thing that worried me was that no matter how hard I searched on the web, I couldn’t find any first hand information about the unit. I asked on forums like gigposters.com and t-shirtforums.com but no one knew anything about the Ranar dryer. Which worried me a little. One of our suppliers, Pocono Screen Supply sold these dryers, so I called them for information. They really didn’t tell me much more than what it said on the web sites I had found, but I decided that because of the price difference this was the unit we would get. Sold here.

The day finally came when we had enough money to order the unit! Waiting for it to come was agony! We ordered it right before Christmas 2009 and the company was closed for the holidays and didn’t ship it until almost the middle of January. So when it came, we were jumping around for joy! We hauled it to the studio and unpacked it and gazed in wonder at the mysterious looking plug. What was this?

We had never seen this kind of plug. My first thought was that they had sent us the wrong unit and it was a 220 volt instead. I called the company and they checked with Ranar and, no, it was the right unit, a 110 volt. But it was a 20 AMP unit. Most circuit breakers are 15 AMP. The circuit breakers in our studio were 15 AMP as it happened. Heck, we replaced the wall socket with the correct socket for that plug and tried it anyway. We wanted that flash dryer baaad. It blew the fuse. Again and again. There was no way. We looked into changing the fuse to a 20 AMP. There was no master cut off switch on that fuse box. We couldn’t find out where to shut off the main power to the studio. So the power couldn’t be cut off to the fuses and I wasn’t going to let Freddy try to hot swap a fuse in a live box. Damn. So what were we to do?

What else could we do? We looked for a new studio.

For a long time we had talked about finding a live/work space. We had started out in the shared basement of Freddy’s apartment building, but the landlord told us he didn’t want us screen printing down there. We did it secretly for a while, anyway. But hiding everything all the time was a huge pain. We tried screen printing inside Freddy’s tiny apartment. We even tried my apartment in Brooklyn. None of these were solutions. One day our wonderful friends from the band The Saints of Pain generously offered to share their rehearsal space with us and we set up our beautiful new studio in the rooms in the back of the space they rented. But there were water and power problems with the building. So, I gave up my apartment of 26 years in the beautiful, historic Park Slope neighborhood of Brooklyn (sigh) and moved in with Freddy to save money. We needed to find a new place to work. And live. We really needed that to be the same place. It took about 5 months of hard looking last year to find a place that we could afford that had enough space. I blurted out “We’ll take it!” once we examined the fuse box in the basement. It had some 20 AMP fuses in the basement! Oh yeah!

And the first time we used that flash dryer to cure shirts was sweet! Very, very sweet. It smelled like victory. Stinky, stinky victory. We’ve been using it for a few months here in our new place.

So, here’s the low down on that Ranar DA-1616 flash dryer for anyone who finds this on the internet, like I couldn’t.
- It’s a 110 volt unit and runs on regular household current, but it takes 20 AMP fuses and wiring and a special wall socket. We were unable to find an extension cord or adapter.
- It takes about 8 to 10 minutes to warm up fully.
- We were told by the manufacturer that it should be run on the highest setting at all times and to adjust the temperature by adjusting the distance of the unit from the shirt. That has worked fine for us, by the way. You can adjust the top up or down and it swings freely around. It has a handle on top that stays cool.
- We were advised that the unit works best if the surface under it is metal. We placed an old empty filing cabinet under it and lay the shirts, etc. on that. That has worked fine, too.
- I monitor the temperature closely with a laser sighted temperature gun until I feel the results I'm getting are consistent and then I only check occasionally through the run.
- It has worked well and even cured some plastisol shirts we had to do to replace some of the damaged ones.

Some of the fruits of our labors are here:
Deaths Head Designs Shirts

Next: Why Screen Print?

Thursday, February 3, 2011

Finally, a good opaque water-based white ink!

We had tried a few water-based white inks and they weren’t as opaque as we would want for most things, ok really for anything, so for a while now we have used white discharge ink whenever we wanted a good white on a black or dark shirt. Which works great and we love it. It does have a couple of drawbacks... we found a couple of brands of shirts and a few colors that don’t discharge well. And when you screen on a cotton/poly blend only the cotton discharges. it’s mostly not a problem, but we were very happy to find a truly opaque white ink for those cases when white discharge won’t do. And it has been very easy to use.

Ryonet’s new OP White EnviroLine Water Based Ink (By Matsui)

We’ve used it for a few projects now, so I feel pretty good recommending it. Here is Freddy screening a shirt with it. We used it right out of the container without adding anything at all to it. You can tell from the photo that it’s pretty sticky, but it doesn’t dry up too fast so you can screen at a comfortable pace.

We used this ink on cotton canvas tote bags and messenger bags that don’t discharge well. We also screened some cotton t-shirts that we wanted to look like construction company shirts. Here are some closeups of the results.


Here are the instructions for the ink:
PRINTING: For best performance heat the pallets to 140 degrees F. before printing. Heating your pallets will help retain the ink on the garment and allow for wet on wet printing without flashing in between. For light color fabric use Matsui ECO-Series RC through a high mesh screen. For dark colored fabric the use of 301 Transparent White as an under-base. For a softer hand use Matsui’s DSPS Discharge (see under basing below). Screens should be flooded if printing is stopped for any period of time. When loading water base ink into your screens, use a good amount of ink in order to insure the ink doesn't dry in your screen. Print with a pull stroke for best results. Back flood screen with a lot of ink gently so ink is not pressed through the design. You shouldn't be able to see your screen or image through your back flood.
DRYING/CURING: The 301 Enviro-Series ink must be cured for 2.5 to 3 minutes at 300 to 320 degrees F under typical infrared heat.
Curing Options: Water based inks cure differently from standard plastisol inks. While plastisol inks cure with infrared once reaching 320 degrees, water based inks cure best with air movement and heat. Air movement is preferred to drive water out of the ink and blow away steam so heat can cure water base pigment properly. Without hot air movement across the ink, water based inks will take much longer to cure. In good air flow, water based inks can cure in under 1 minute while it may take 2.5 to 3 minutes in a standard infrared dryer. (Paper can be allowed to air dry)

Here's what we did: We didn't heat the pallet before printing since right now the flash dryer is in the other room. We just screened the stuff the way we do everything else, following the guidelines as far as using a good bit of ink and putting down a good thick back flood, and laid the things out to dry. We found that the ink air-dries somewhat slowly. We let the ink dry about an hour (it was still tacky in a few spots) and then we cured it under our forced air flash dryer. I let the screened item get up to around 340 degrees and measured the temperature with a thermometer gun (Raytek MT4 Mini Temp) and let it cure at that temperature for 40 seconds or so. The total time under the flash dryer was probably a minute and a half to two minutes. You could cure this with a heat gun, too. We are very pleased with the results overall.


The bags and t-shirts are for sale on our web site!
Cabeza de Muerte tote bags
Cabeza de Muerte messenger bags
Zombie Proof shirts

Next: Drying and Curing Inks DIY Style