1. Art problems -
A. Start with good artwork, properly prepared. Don’t use a low resolution jpeg and think you will get a good screen print out of it. The art should be a minimum of 300 ppi at print size.
B. Make sure you can print the design correctly and match it with the correct screen mesh for the artwork.
C. If you have a customer, make sure they sign an approval of the final design. You’d hate to reprint a design at your own expense because a word was misspelled!
Here's a nice design made to look distressed. (a new design we are testing) Because of the small details we burned this art on 156 mesh screens to print on t-shirts.

2. Screen Exposure problems -
A detailed list of screen problems here: Troubleshooting Screen Problems
3. Bad registration -
A. Screens can become loose in the bracket on the press if not tightened enough.
B. The platen might be moving if the screw is not tightened enough. Turn it as tight as you can being careful not to strip it.
C. The shirt might be moving if you don’t have enough adhesive on the platen.
4. Screen break down -
A. If the screen was under exposed, the emulsion can loosen and come off. We always “post-expose” the screen. Which means we either place it in the sun after it’s been washed out and dried or we expose it again in the exposure unit to set the emulsion.
B. The squeegee can wear through the emulsion on a long print run or on a screen that has been used a lot. If the worn spots are outside of the design area you can clean the screen, spread a thin coat of emulsion over the worn areas and expose it to repair the bare spots.
5. Bad ink curing, ink under cured or over cured -
A. Check the curing temperature with a temperature gun. And know what temperature the ink is supposed to cure at, of course. I usually print out a sheet of instructions that go with the ink and stick it to the lid of the ink container.
My instructions unfolded. They are stuck to the lid with double-sided tape.

6. Incorrect squeegee angle -
A. Try for a consistent 45 degree angle when applying ink to the screen. Ink goes on pretty smooth at this angle. At an angle of 60-degrees or more, the ink may not get through the mesh correctly and evenly. An angle of 30-degrees or less can make the ink print too heavily onto the fabric.
B. You may need to experiment with the squeegee angle and practice to get it right, see what works for you and keep it consistent. You can also experiment with a “push” print stroke as opposed to the usual “pull” print stroke. There are cases when a push stroke can be useful. But always do one or the other, don’t switch between strokes.
Freddy usually screens a bit closer to a 60 degree angle, but that's what seems to work for him.

7. Ink spots or smudges on garment or product -
A. Keep the work area and your hands clean.
B. Check the screen carefully for pinholes and fill them with a screen touch-up pen or cover them with a piece of tape.
C. Wash out small spots with a wet shop towel or a spot cleaning gun. If you can’t clean it, keep the shirt and use it for test prints.
8. Design placed incorrectly -
A. Line up you screen carefully. We usually use a t-square to make sure the design is straight.
B. Not all shirts or other garments are sewn correctly or consistently. So you may not be able to use the collar or center crease to position a shirt. The most reliable way I’ve found to center a shirt is this: How to Center a Shirt for Silk Screening
9. Too much ink is getting printed onto the shirt -
A. You may be using too much pressure. Don’t press down too hard on the squeegee and use even pressure all the way across the print.
B. You may have gotten too much ink into the mesh on the back flood. Be careful as you back flood and don’t press down too hard or go over it too many times. If your ink does get too heavy, pull a few prints on test sheets without back flooding to clear out the screen.
C. The ink may be too thinned out
D. You may have an old squeegee with edges that are rounded and need to be sharpened.
10. Too little ink is getting printed onto the shirt -
A. Use a coarser mesh.
B. Make more than one squeegee pass to print. We sometimes do as many as 3, but that is usually the most we need.
C. The screen may be getting clogged. We will rub the underside of the screen with a wet shop towel and then screen a test print or two to try to clear it out. We print on test print squares or misprinted t-shirts and use blank newsprint when test printing for posters and art prints. (Note: We have been told that spraying water mixed with a little bit of dish soap on the underside of the screen before you put any ink on it helps when you print. We mean to try this next time we print.)
D. Try printing on a soft base. We sometimes use a platen covered in neoprene fabric. Especially when we want to print over collars or seams (more on this topic later).
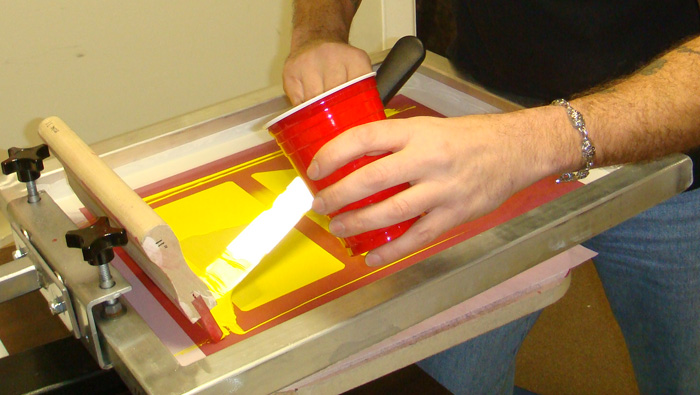
Here's Freddy adding more ink to a screen. You can see that there wasn't enough ink to back flood properly and it's spotty behind the cake spreader he uses for the ink.
Mistakes will happen, but my best general advice is to work carefully to head off problems before they happen.
Next: How to prepare a screen for printing.
As always, extremely informative! I silk screened something one lone time back in high school. I barely remember it.
ReplyDeleteI love that! I always just go to a company to print out my own custom t-shirts. Seems like a fun project though.
ReplyDeleteOoh, I have never heard of a screen touch up pen. Where can I find one? Or do you know what is in it? Can I use other household supplies to touch up little spots where the emulsion came off (e.g. nail polish)? I used water-based paints and do not make my own screens.
ReplyDeleteVictory Factory sells a blockout pen for 7 bucks and they also sell blockout tape.
ReplyDeletehttp://www.victoryfactory.com/film.html#blockout_pen
We don't use things like nail polish to touch up holes since we want to be able to clean and reuse the screens and I'm not sure nail polish would come out. But you can use a blockout pen and you can use tape to cover a hole or three. Whatever will stick best. Sometimes that is scotch tape or masking tape. I have also painted on some emulsion (very thinly) to fill in larger holes or repair spots where the emulsion has deteriorated. I let it dry, or dry it with a hair dryer on low, and expose it to sunlight to harden it. That can be done fairly quickly, maybe a hour or less, and it has allowed us to keep working at least.
This comment has been removed by a blog administrator.
ReplyDeleteThis comment has been removed by a blog administrator.
DeleteI am interested in the comment you made...
ReplyDeleteNote: We have been told that spraying water mixed with a little bit of dish soap on the underside of the screen before you put any ink on it helps when you print. We mean to try this next time we print.)
....
have you tried this? did it work? did it help to keep small details unclogged?
I would like to say that this blog really convinced me, you give me best information! Thanks, very good post.
ReplyDeletePrinthead911
I am actually still new at screen printing and the ink under or over cured got me curious. I have this thermometer for baking, can I use that, too?
ReplyDeleteWe use a laser thermometer because it gives an instant temperature reading and when you are heat curing, I think you need that. We use this one:
Deletehttp://www.amazon.com/gp/product/B0002198GY/ref=as_li_ss_tl?ie=UTF8&camp=1789&creative=390957&creativeASIN=B0002198GY&linkCode=as2&tag=advindiyscrpr-20
But there are less expensive ones. Check on Amazon and look at the reviews to get an idea of which ones are good. It's definitely worth getting. And we have found lots of other uses for it, too!
The top ten worst mistakes of screen printing was interesting.But I think the major mistake is too much ink is getting printed onto the shirt.
ReplyDeletePrint Tshirt
Screen print
ReplyDeleteThank you for sharing this information. The information was very helpful and saved a lot of my time.
This comment has been removed by a blog administrator.
ReplyDeleteThanks a lot for the advice!
ReplyDeleteOur school just launched a student operated website selling the t-shirts we designed and silk screened. These sorts of 'look-outs' are really helpful to us!
Check us out if you've got the time, our students would love it:
http://www.wdsdesigns.org
this was a great post thanks alot for the information, ive been looking into these kits screen printing kits do you think they are good quiality? thanks alot
ReplyDeleteThe most comprehensive list that I have ever seen. Thank you greatly for posting and I referenced this when starting : )
ReplyDeleteHow can I remove a word that has been placed on a shirt with silk screening? Is there a way to cover it up...such as bondex mending tape? Thanks!
ReplyDeleteThis comment has been removed by a blog administrator.
ReplyDelete